Video Bridge Guide for Presenters and Guest Admins
A video bridge allows presenters to connect to an event and broadcast from different camera sources and locations. As a presenter, you will join the event from your computer and connect the video source that you'll use to speak to the audience. Often this is a webcam, but you can also broadcast and present from a video conferencing system, Skype for Business, or a telephone (where you're not on camera).
Use this guide to learn how to test your system and connect to the video bridge.
This guide contains the following topics:
System requirements
All presenters and venues must meet the following minimum system requirements:
- Operating system - Windows 10, Windows 8.1+ Pro, macOS 10.14+
- Processor - Intel Core i5 3.0GHz or equivalent
- RAM - 4GB
- Internet connection - A dedicated and hardwired high-speed connection of 1.5 Mbps+ (upload and download). We do not recommend using a Wi-Fi connection since it is prone to dips in bandwidth that can negatively impact your video connection.
- Internet Browser - Chrome (latest version), Firefox (latest version), Microsoft Edge (latest version)
Note: Firefox does not support screensharing for Video Bridge at 720p events.
- Webcam - High quality or HD webcast (for example, Logitech C920)
- Microphone - Headset microphone or webcam mic with built-in noise-cancelling
Note: If you are using a microphone, use headphones or earbuds to prevent feedback from your computer speakers.
Before the event, presenters and venues must also:
- Plug in their computers. Do not run an event on battery power.
- Disconnect from the VPN.
Test your system before the event starts
Don't want to read? Watch the video.
It's important that you make sure your system is compatible before the event begins to identify and resolve any issues. At least 48 hours before the event, join the Live Studio and run a diagnostic on your system with the network and equipment you plan to use on the day of the event. This checks the quality of your audio and video connections.
You should have received an email with login details and a link to the Guest Admin or Guest Presenter Access site. The Guest Admin site includes a button that lets you enter the Live Studio.
To test your webcam and microphone:
- Sign in to the Guest Admin site and click Live Presenter Studio.
- In the Live Studio, click Test your webcam.
- Enter your name and click Next.
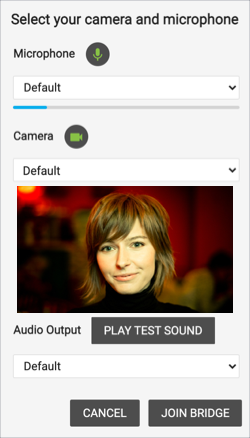
- Select the Microphone, Camera, and Audio Output sources you will use during the event. Confirm that the microphone volume level and webcam preview work properly and click Play Test Sound to make sure you can hear the event audio during the event.
- Click Join Bridge and follow the guided connection test instructions.
The test records a short clip of your audio and video and plays it back to you. Make sure the video plays clearly, without feedback or echo. If it does not record correctly, there could be a network connection issue. Check that you have a wired (LAN) connection to the internet and that it is active.
If you have any issues, run the test again. If you continue to have issues, contact support or your event host.
Connect to the video bridge
Don't want to read? Watch the video.
To join the video bridge:
- Sign in to the Guest Admin site and click Live Presenter Studio.
- Click Connect using my webcam.
- Enter your name and click Next.
- Select the Microphone, Camera, and Audio Output sources you want to use for the broadcast. Confirm that the microphone volume level and webcam preview work properly.
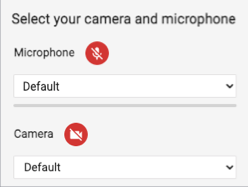
If you are a technical assistant or moderator who will not speak or appear on camera, click the Mic button to mute your microphone and click the Camera button to turn off your webcam.
- Click Play Test Sound to make sure you can hear the event audio during the event.
- Click Join Bridge.


