Live Events
Broadcast and present a Live event.
- Ways to broadcast a Live event
- Join the Live Studio
- Add a virtual background to your webcam or video stream
- Add live captioning to an event
- Change the event window layout during a live event
- Encoder stream bit rates
- How do I broadcast using an encoder?
- Live stream bit rates
- Presenter Best Practices
- Share a video during a Live event
- Stream optimization
- Video Bridge
Ways to broadcast a Live event
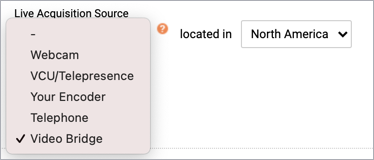
We offer multiple ways to broadcast no matter the scale of your event, the venue, or the location of your presenters. When you schedule a Live event, you select how presenters will connect their audio and video to broadcast to the audience. The device or method is the live acquisition source for the event.
Note: This only determines how your presenters connect their audio and video and broadcast to the audience. All webcast events include visual elements such as headshots, slides, overlay videos, and more.
If presenters will speak to the audience but remain off-camera, select Telephone as the acquisition source. If they'll broadcast audio and video, you can use a single webcam, the video bridge for multiple webcams, an encoder, or a video conferencing unit (VCU).
Available options depend on your account settings. Contact your sales representative or Support to request additional broadcasting options.
Broadcast audio only
Select Telephone to broadcast the presenter audio with a telephone connection. Up to 20 presenters can stream their audio from a telephone or VoIP connection. Presenters dial in to the presenter bridge and a backup bridge is included as a backup audio source.
Broadcast audio and video
There are several options for connecting presenters and streaming their audio and video to the audience. They can connect directly using their own webcams or connect to another system or service first and then stream that source into the event.
- Webcam - A single webcam connection. Broadcast one presenter or several presenters using the same webcam. Before the event, you must install a driver on the computer you plan to use on the day of the event that lets the event connect to your webcam. Recommended if the event has only one presenter or one webcam source.
- Video Bridge - For multiple presenter video streams. Allow up to 20 presenters to connect their webcams and broadcast.
- Advanced Video Bridge - Allow presenters to broadcast from a video conferencing system, Skype for Business, or telephone audio.
- VCU (Video Conferencing Unit) - Recommended for conference rooms. Use your own video conferencing unit to provide the video feed for the presentation. Before the event, get the H.323 or SIP address for the VCU and ensure it accepts incoming connections. In the Live Studio, the advanced video bridge uses the address to call out to the VCU and bring it into the event.
- Your Encoder - Use your own RTMP-enabled encoding device to broadcast multiple webcams and microphones from your venue as a single stream.
Join the Live Studio
To moderate or present at a live event, enter the Live Studio and connect your audio or video. The Live Studio has controls for presenting slides, playing videos and other content, managing Q&A, and more.
The way you join the Live Studio depends on whether you have a webcasting account or whether you were invited to be a presenter or assist with Q&A.
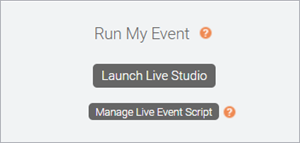
Join as a moderator
If you have a webcasting account, sign in to the Webcast Admin portal and in the My Events list, click Edit to open the Live event. On the Event Summary tab, under Run My Event, click Launch Live Studio.
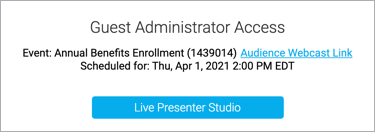
Join as a presenter
If you were invited to present at the event, you should have received an email with login details and a link to the Guest Admin Access site. Click the link and enter your information or credentials to sign in, and then click Live Presenter Studio.
Join as a Q&A manager
If you were invited to manage audience questions at the event, you should have received an email with login details and a link to the Guest Admin Access site. Click the link and enter your information or credentials to sign in, and then click Manage Live Q&A.

Add a virtual background to your webcam or video stream
The Webcast service does not currently offer virtual backgrounds; however, if you're broadcasting a single webcam or multiple webcams (video bridge) during the event, you can add them to your video stream with a third-party virtual webcam app. A virtual webcam app is software that allows you to add virtual backgrounds, filters, and more to your webcam video. After you install it, the virtual webcam displays as a new webcam source that you can select when joining the event.
If you are broadcasting an event with an advanced video bridge (ask your host if you're not sure), you can connect to the event from an online meeting app like Zoom or WebEx that offers virtual backgrounds.
Supported virtual webcam apps include:
- CamTwist
- Chromacam
- Manycam
- OBS with Virtual Camera
- Snap Camera
- Xsplit VCam
Note: Download and test the app in the Live Studio at least 48 hours before the event starts. We do not provide support for third-party applications.
Change your background with a virtual webcam
Before joining the Live event, start the virtual webcam app and set up your virtual background.
Important: You must keep the virtual webcam running during the event for your virtual webcam to display properly.
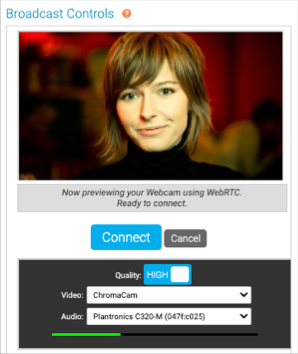
Single webcam
To connect to the event with a virtual webcam:
- Join the Live Studio.
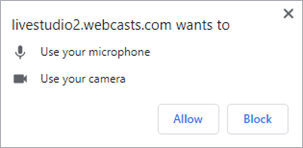
- In the Live Studio, a notification displays in the top left of the window that requires you to allow the Live Studio to access your computer's camera and microphone. Click Allow to grant permission.

- In the Broadcast Controls panel, click Preview.
- For your Video source, select your virtual webcam and then select the microphone you want to use for the broadcast. Check your webcam preview and audio levels to verify that they work properly
Note: This is only a preview. Your webcam is not visible to the audience or other presenters.

- Click Connect to connect your audio and video to the event. Once you're connected, other presenters can see your webcam.
Note: The connection can take up to two minutes to establish. If your stream fails to connect, click Cancel and then preview and connect it again.
Multiple webcams (video bridge)
To connect to the event with a virtual webcam:
- Join the Live Studio.
- In the Live Studio, click Connect using my webcam.

- Enter your name and click Next.
- For your Camera source, select your virtual webcam and select the Microphone and Audio Output sources you want to use for the broadcast.

- Click Join Bridge.


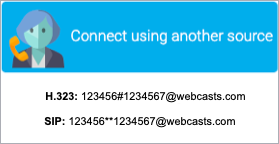
Change your background with an online meeting app
To connect to the event with a meeting application:
- Before joining the Live event, start your meeting app and set up your virtual background.
- Sign in to the Guest Admin site and click Live Presenter Studio.
- Click Connect using another source and use the SIP or H.323 address to connect to the webcast video bridge from your meeting app.

Add live captioning to an event
For Live events with StreamText captions only. The Webcast service does not have a built-in live captioning feature. However, you can create a custom tab and include real-time captioning delivered through the StreamText platform in your Live event. To include live captioning, you must request captioning services, set up a custom tab with the StreamText embed code, and then invite the captioner as an attendee. On the day of the event, the captioner joins as an attendee and types the captions into StreamText, which are then displayed to the audience in the custom tab.
Notes:
- You can't add live captioning to the archived version (replay) of a Live event. To add captions to an event replay, see Add captions to a recorded event.
- Because live captioning is not a feature of this platform, Support is not able to set up, test, or manage captioning for self-service clients. If you would like someone to manage an end-to-end integration, contact your sales representative to arrange a consultation package.
Jump to: Request captioning services | Example code | Set up the live captions tab | Preview your work | StreamText URL formatting
Request captioning services
We can book live captioning for your event.
To request live captioning:
- If you have a Standard or Premiere plan, send us an email at GlobalReservations@webcasts.com.
- If you have an Essential, Professional, or Enterprise webcast plan, go to the Professional Services Request site.
You can also use your own third-party captioning provider, as long as they use the StreamText platform.
When you request live captioning through us, we provide your event ID to the captioning provider, who uses it to identify your event in their StreamText account. When you set up the custom tab, include this event ID in the embed code. If you schedule your own captioner, we recommend that you give them your event ID to use as their StreamText event name (identifier); confirm the value they used and include it in the embed code. To learn more about the process for scheduling captioning services, contact Support.
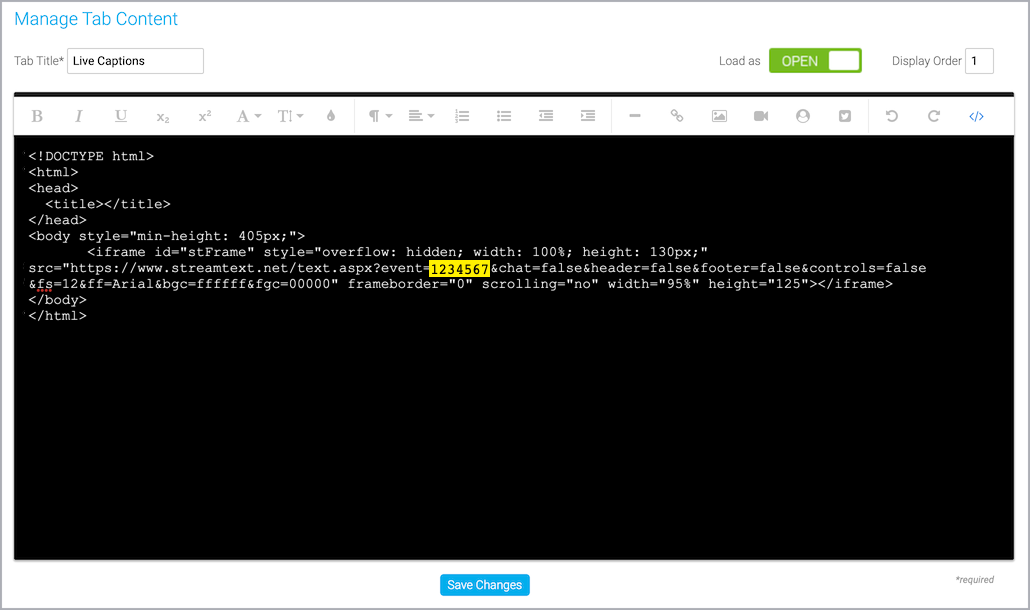
Example code
Use the following example code to embed captions in the custom tab. In the code, find event=1234567 in the code and replace 1234567 with the event ID for your event. If you're using your own captioning services, replace 1234567 with the event name provided by the captioner.
Important: If you requested captions in a language other than English, you must include an additional language parameter to the link for them to display correctly. For example, if you requested captions in Spanish, you must add &language=es to the link after the event ID or name. For more information, see StreamText URL formatting.
    <!DOCTYPE html>
    <html>
    <head>
      <title></title>
    </head>
    <body style="min-height: 405px;">
    <iframe id="stFrame" style="overflow: hidden; width: 100%; height: 130px;" src="https://www.streamtext.net/text.aspx?event=1234567&chat=false&header=false&footer=false&controls=false&fs=12&ff=Arial&bgc=ffffff&fgc=00000" frameborder="0" scrolling="no" width="95%" height="125"></iframe>
    </body>
    </html>
Set up the live captions tab
Sign in to the Webcast Admin portal and edit the Live event.
To add the live captions tab to an event:
- On the left panel, click the Event Content tab.
- Under Optional Content, expand the Add Custom Player Tabs section and click Add Sidebar Tab.
- Enter a name for the captioning tab and set Load As to Open.
- Optional. The Q&A tab displays under the video player in your event by default. To have the captions display under the video player, enter 1 for the Display Order.
- At the right side of the editor, click </> to switch to code view.
- Delete all the placeholder code.
- Copy the example code and paste it into the editor.
- In the code, find event=1234567 and replace 1234567 with the seven-digit event ID for your event or the event name.
If your captions are in a language other than English, be sure to include the language parameter in the link.

- Click Save Changes to save the coding. Then click Save and Continue to save changes to the event content.
Preview your work
Always preview the tab setup before the Live event.
To test captioning for your event:
- In the Webcast Admin portal, edit the event.
- On the Event Content tab, edit the sidebar tab you created for captioning and replace your event ID or name with ihaveadream.
...src="https://www.streamtext.net/text.aspx?event= ihaveadream &chat=false...
- Click Save Changes to save the coding. Then click Save and Continue to save changes to the event content.
- Now preview the web player: click the Event Summary tab and at the top of the page, click View My Event .
Make any changes to the display. When ready, go back and place your event ID in the sidebar tab coding.
StreamText URL formatting
The captions can be visually controlled by passing various query strings (parameters) in the URL. Here are the options used in our example code; we hide various elements to ensure captions display well in a sidebar tab. For a complete list of options, see this StreamText help article.
| Query String | Purpose | Used in our example code | Result |
|---|---|---|---|
| language |
Required for displaying captions other than English. The ISO 639-1 code for the caption language. Examples: |
N/A | English captions |
| chat | Displays the chat box | &chat=false | Chat box hidden |
| header | Displays the title and the controls | &header=false | Header hidden |
| footer | Displays gray footer with copyright | &footer=false | Footer hidden |
| controls | Displays a toolbar that allows each attendee to change the font, sizing, and other formatting of the captions they're viewing | &controls=false | Controls hidden |
| fs | Font size | &fs=12 | 12 pt font |
| ff | Font family | &ff=Arial | Arial font |
| bgc | Background color | &bgc=FFFFFF | White background |
| fgc | Foreground color; sets the text color | &fgc=00000 | Black text |
Change the event window layout during a live event
During a Live event, you can change the layout of the event window that the audience sees to feature different content. The available layouts depend on the type of broadcast (video or audio) and player size you selected in the event setup.
Note: Before the event begins, go to the Player & Branding tab, and under Player Layouts, select Enable Layout Switching. To learn more, see Enable layout switching for an event.
To change the event window layout:
- Join the Live Studio.
- In the Live Studio, click the Layouts tab.
- The available layouts are displayed and the name of the layout that is being shown to attendees is highlighted in green. To change the layout, click another one.

The layout is displayed to attendees.

Encoder stream bit rates
Adaptive Bit Rate (ABR) Encoder Events (Recommended)
You are only required to send one stream (per primary and backup). All streams are transcoded and aligned for soother quality transitions. If the system receives a higher stream than the bit rate listed in the 'Source Encoder Sends' section below, it will automatically transcode down to the bit rate shown in the 'Audience Receives' section. Sending a lower bit rate than those listed is not recommended.
The video player has a widescreen (16:9) aspect ratio with the following size options. Audio and video streams to attendees at the listed bit rates. We recommend using an audio bit rate of 96 kbps, which is included in the total bit rate. See 'System Requirements for encoder broacasts' for additional information.
Source Encoder Sends
| Video Player Size | Recommended Video Bit Rate | Recommended Audio Bit Rate | Total Bit Rate with Recommended Settings |
|---|---|---|---|
| 480p (854x480) | 800 kbps | 96 kbps | 896 kbps |
| 720p (1280x720) | 1700 kbps | 96 kbps | 1796 kbps |
| 1080p (1920x1080) | 3000 kbps (3mbps) | 96 kbps | 3096 kbps |
Audience Receives
| Video Player Size | Video Bit Rate | Audio Bit Rate | Total Bit Rate |
|---|---|---|---|
| Sending 480p (854x480) | |||
| Low - 270p (480x270) | 400 kbps | 96 kbps | 496 kbps |
| High - 480p (854x480) | 800 kbps | 96 kbps | 896 kbps |
| Sending 720p (1280x720) | |||
| Low - 270p (480x270) | 400 kbps | 96 kbps | 496 kbps |
| Medium - 480p (854x480) | 800 kbps | 96 kbps | 896 kbps |
| High - 720p (1280x720) | 1700 kbps | 96 kbps | 1796 kbps |
| Sending 1080p (1920x1080) | |||
| Low - 480p (854x480) | 800 kbps | 96 kbps | 896 kbps |
| Medium - 720p (1280x720) | 1700 kbps | 96 kbps | 1796 kbps |
| High - 1080p (1920x1080) | 3000 kbps (3mbps) | 96 kbps | 3096 kbps |
Constant Bit Rate (CBR) Encoder Events
You are only required to send one stream (per primary and backup). All streams are distributed at the bit rate set at the encoder. Listed below are the system-recommended settings for each player size.
Important: Streams that exceed 6 mbps (6,000 kbps) will have their connection terminated by the system. Please note that this includes both the audio and video bitrates together.
The video player has a widescreen (16:9) aspect ration with the following layout options. Audio and video streams to attendees at the provided bit rates. We recommend using an audio bit rate of 96 kbps, which is included in the total bit rate.
See 'System Requirements for encoder broacasts' for additional information.
| Video Player Size | Total Bit Rate |
|---|---|
| 480p (854x480) | 896 kbps |
| 720p (1280x720) | 1796 kbps |
| 1080p (1920x1080) | 3096 kbps |
The system will automatically transcode to the settings above for the on-demand archive, regardless of live bit rates used. With CBR events, you have the option to modify the streaming rate for a higher or lower live bit rate.
How do I broadcast using an encoder?
To access the information needed to connect your encoder for the event, click the Media Encoder Settings button in the Broadcast Controls area of the Live Studio. Your encoding device (e.g. Wirecast) will need to be setup to send a RTMP stream for broadcast.
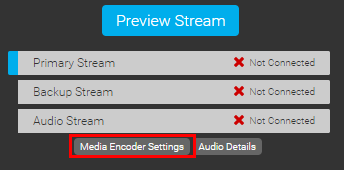
Click Media Encoder Settings to access the stream path(s), codec information and recommended stream settings.
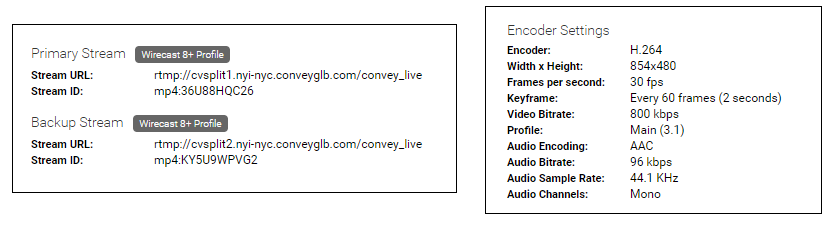
Copy and paste the Primary Stream URL from the Encoder Settings to your encoding device settings. Then, copy and paste the Primary Stream ID into the stream setting of your encoder. Next, confirm that your encoding device is using the same settings as listed in the Encoder Settings . NOTE: Bit rate can be adjusted based on your requirements.
To add a redundant backup stream on the event, copy and paste the Backup Stream URL from the Encoder Settings to the secondary encoding device settings. Then, copy and paste the Backup Stream ID into the stream setting of your encoder. Next, confirm that your secondary encoding device is using the same settings as listed in the Encoder Settings . NOTE: Bit rate can be adjusted based on your requirements.
Start your encoder to begin streaming to the Webcast Server. Once your encoder confirms a successful connection, click the Preview Stream button to view the stream(s).
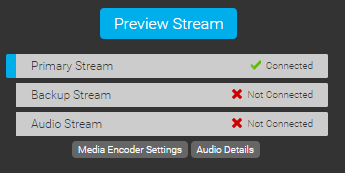
Connected text will appear in the Primary Stream and/or Backup Stream boxes when a stream has been connected. Once the connection process is complete and you see your video in the Live Studio, click Start Webcast to begin broadcasting your event.
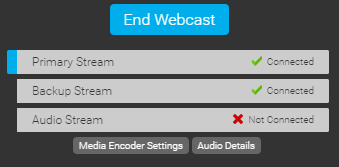
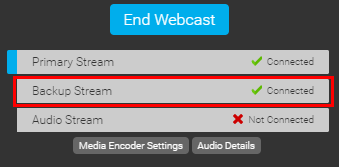
To switch between the primary and backup streams during an event, click on the Primary Stream or Backup Stream box. The box highlighted is green will appear in the Broadcast Controls window and is active on the presentation.
Live stream bit rates
Presenter Video, Screen Share (video bridge), and Inline Videos
If you're broadcasting telephone audio only, the video player contains a 320 x 240 pixel space for headshots to be displayed and uses a 96 kbps stream.
If you're broadcasting audio and video, the video player has a widescreen (16:9) aspect ratio with the following layout options and streams to attendees at the listed bit rates. The audio bit rate is always 96 kbps and is included in the total bit rate.
480p (854 x 480)
- Webcam: 896 kbps (High) OR 296 kbps (Low)
- Encoder: 896 kbps
- VCU: 896 kbps
- Video Bridge: 896 kbps / 496 kbps (Adaptive Bit Rate)
720p (1280 x 720)
Note: 720p access may not be available on all accounts. Please contact Support with questions.
- Webcam: 1796 kbps (High) OR 296 kbps (Low)
- Encoder: 1796 kbps
- VCU: 1796 kbps
- Video Bridge: 1796 kbps / 896 kpbs / 496 kbps (Adaptive Bit Rate)
Overlay Videos
The bit rate of overlay videos depends on the bit rate of the video when you uploaded it. If you uploaded a video:
- Below 800 kbps, the video will be transcoded at 800 kbps
- Between 800 to 1700 kbps, the video will be transcoded at the uploaded bit rate
- Over 1700 kbps, the video will be transcoded to 1700 kbps
Presenter Best Practices
Below are a list of best practices for presenters:
What should a presenter have available for the presentation?
It is recommended that all speakers prepare the following:
- For audio events, a telephone with a quality headset or handset for EACH presenter/presentation room.
- Speakerphones have poor sound quality and tend to pick up background noise. If you must use a speakerphone try putting something padding under the phone (things around the office such as legal pads or newspapers will do the trick) and make sure the phone is away from computer fans, projectors, and air conditioning units.
- Cellphones and cordless/wireless headsets or phones of any kind should be avoided as they are subject to disconnection and interference.
- For video events, an speaker that will be on video should have an internal or USB webcam.
- A quality headset is recommended as the audio source on video events. A webcam's internal microphone will work, but a headset will produce higher quality audio.
- A hard copy printout of your slides.
- Make sure you print out the same PPT file that has been uploaded. In case your computer or internet connection fails, you can reference your slides while someone else flips the slides for you without any interruption to your recording.
- A wired internet connection.
- Wireless can work, but we do not recommend it as the signal can be subject to drops and interference. Wireless internet should NOT be used for video events or screen sharing.
- It is recommended that you test your system briefly before joining the events pre-call.
- To further improve computer performance, it's recommended to restart your computer shortly before the event and close any unneeded programs or browser tabs.
- Log off of your VPN
- VPNs can reduce your available bandwidth, which is especially important when broadcasting video. We recommend logging off your VPN while presenting.
How can I test my system for presenting?
For any testing, you should use the computer and browser that you intend to present from. Two seemingly identical computers can have very different program and system configurations.
Once you have received the Guest Admin, please log into the webcast Live Studio to test your system.
- Click the thumbnails or the Next Slide button in the slide tool to flip slides. If your computer is working correctly, you should see the slides advance.
- There should be a Chat box in the lower left corner of your screen. Type a message into the box provided and click Submit. If your computer is working correctly, you should see your message in the Chat log.
If you will be using your webcam or screen sharing on an event, please test your system here: https://event.webcasts.com/test
Please note that if you run into any testing issues, you may be asked to provide a screen capture of the results of this system test.
What if I have issues with the Webcast Live Studio during a live call?
The Live Studio checks the presenter's connection status approximately every three seconds. When the Live Studio detects a sustained connection drop (an approximate 10-15 sec. without a response from our servers), a message is displayed in the Live Studio alerting the presenter:
"Could not connect to the server. Please check your internet connection.(1)".
This message appears in an overlay and the presenter cannot click on any Live Studio elements while their connection is down. Once the connection has been reestablished, the message will disappear automatically and the presenter can resume their Live Studio interaction.
If the Live Studio becomes unresponsive without an internet connection failure:
- The presenter should first attempt to re-launch the Live Studio by closing the Live Studio browser window and clicking the "Launch Live Studio" button on the Guest Presenter page (or the Event Summary page for admins managing their own live events).
- If the presenter is unable to re-establish their internet connection or the Live Studio remains unresponsive after re-launching, the presenter may need to contact their IT team for assistance.
- If the presenter is unable to flip their slides for a sustained period of time, it is recommended to designate an individual (preferably a colleague familiar with the content) to assist with flipping slides for the webcast audience. The presenter should reference slide numbers from their print out copy of the slide deck as they speak to the material.
Share a video during a Live event
In the Live Studio, the Overlay Videos tab shows all uploaded videos. From here, you and other presenters can preview them, play them for the audience, and stop sharing them.
Notes:
- Before your event goes live, have a least one presenter preview each overlay video. This helps to cache the videos on the event servers (content delivery network or CDN) and provide faster delivery during your event.
- The stream is delayed for attendees, so you must allow the event to run for 15 seconds before sharing a video. This ensures all attendees see the video.
- Once you share a video, you can only share it again the way you played it the first time (overlay or inline). For example, if you shared a video as an overlay, you can't share it in the video player.
- All presenters are automatically muted while previewing and sharing a video.
- You can't share a video and screen share at the same time.
Jump to: Preview a video | Share a video as an overlay | Share a video in the video player (inline) | Stop sharing a video
Preview a video
Preview your overlay videos to make sure they display correctly to the audience during the live event. When you preview a video, the video is only visible to you.
To preview an overlay video:
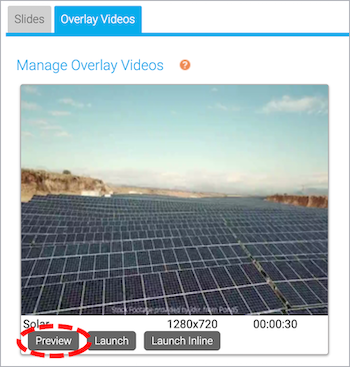
- In the Live Studio, click the Overlay Videos tab.
Thumbnails of the uploaded videos are displayed with the video name, size, and duration.
- Under the video you want to test, click Preview.

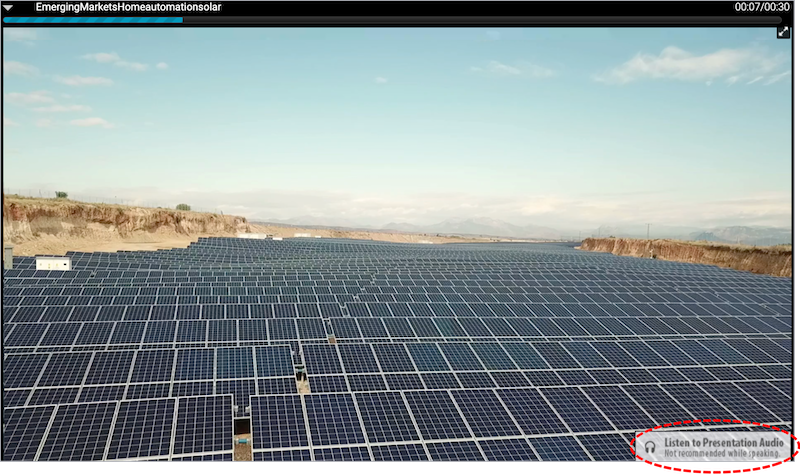
The video plays in a new window as an overlay.
Note: The audio is muted when you preview a video. To test the video's audio, click Listen to Presentation Audio.

Share a video as an overlay
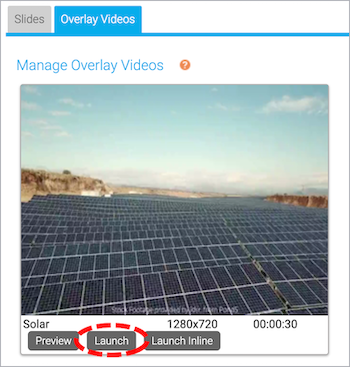
- In the Live Studio, click the Overlay Videos tab.
Thumbnails of the uploaded videos are displayed with the video name, size, and duration.
- Under the video you want to view, click Launch.

- A message displays asking if you want to send the video to the audience. Click OK.
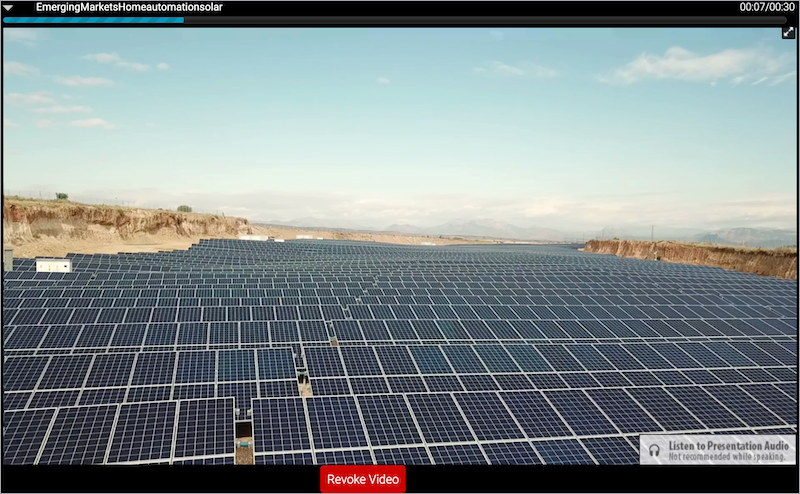
The video is shared with the audience and plays in a new window as an overlay for you and other presenters. The video includes a progress bar to let you know when the video is done playing.
Note: Only the audience hears the video's audio. To prevent feedback, we recommend that presenters don't listen to the audio during the event.

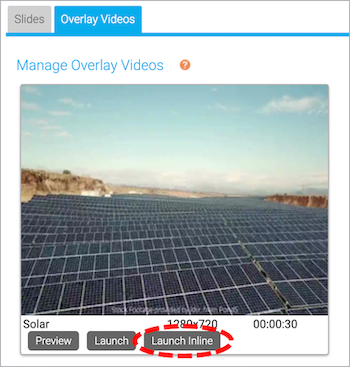
Share a video in the video player (inline)
Notes:
- In the Live Studio, click the Overlay Videos tab.
Thumbnails of the uploaded videos are displayed with the video name, size, and duration.
- Under the video you want to view, click Launch Inline.

- A message displays asking if you want to send the video to the audience. Click OK.
The video plays for the audience in the video player and plays in a new window as an overlay for you and other presenters. The video includes a progress bar to let you know when the video is done playing.
Note: Only the audience hears the video's audio. To prevent feedback, we recommend that presenters don't listen to the audio during the event.
Stop sharing a video
While a video is being shared with the audience, you or another presenter can revoke it and stop it from playing.
Important: When a video is revoked, it is not included in the event replay.
To stop sharing a video:
- At the bottom of the video, click Revoke Video.
- A message displays asking if you want to revoke the video. Click OK.
Stream optimization
It is important for any webcasting professional to understand if their network is ready to support a webcast. While our webcasting platform consumes far less bandwidth than major web conferencing tools, it still requires a high-speed connection to the internet to assure a quality user experience. Since the Webcast platform can support video-enabled webcasts for up to 10,000 attendees or more, there is a greater need to ensure your network can handle the attendance capacity.
If your audience resides largely on a single corporate network, you may need to consult with the IT department to confirm there is adequate bandwidth to support your event. If adequate bandwidth is not available, you should consider leveraging one of the Webcast platform’s stream optimization solutions. These options include:
Adaptive bitrate streaming
Adaptive bitrate streaming works by detecting a user's bandwidth and adjusting the quality of the video stream accordingly. This allows your webcast viewers to receive streaming video at an appropriate bitrate for their bandwidth, ensuring a high-quality experience for all participants.
Benefits of adaptive bitrate streaming:
- Allows viewers with high-speed internet connections to receive a HD quality video stream.
- Viewers who do not have a high-speed internet connection, who may be on a public wifi connection or on a shared internet connection, will receive a lower bit-rate stream to ensure a buffering free video stream.
- Adaptive bitrate streaming is fully automated in the Webcast platform, making the process seamless for viewers.
Peer-to-peer (P2P) streaming
A P2P network optimizes video by enabling audience members to pull streams from other event participants on the same network. This method can reduce the amount of public IP bandwidth by up to 95%. A P2P solution requires a software client to be distributed to the global viewing audience by group policy or other installation method. The P2P software client is fully integrated with the webcast application and it automatically connects to, routes, and rebroadcasts video signals.
We partner with Hive Streaming in this space for P2P stream delivery.
Benefits of P2P streaming:
- Allows a high volume of viewers on the same corporate network to view HD video with minimal impact on the corporate internet connection.
- Once deployed the solution eliminates the need for the Network Engineering resources typically required to support video streaming using network appliances.
- P2P streaming is fully automated, making the process seamless for viewers.
Multicasting
In computer networking, “multicast is the delivery of a message or information to a group of destination computers simultaneously in a single transmission from the source.” Essentially multicasting takes one webcast video stream from the internet and redistributes it to internal viewers using a standard multicast IP. This alleviates the bandwidth strain put on the corporate network's internet connection. We partner with RAMP, the leader in HTML5 (HLS) multicasting.
Benefits of multicasting:
- Reaches large internal audiences with HD video without impacting either your corporate WAN or internet connection.
- Offers self-service “plug and play” options and setup and testing provided by a webcast professional.
Stream caching
Stream caching requires a minimum of two network appliances capable of intercepting, caching, and distributing video streams. This limits the amount of public IP bandwidth consumed by delivering streams from cache behind the firewall. While this method normally requires ongoing dedicated resources from an internal Network Engineering or Security team, once deployed the solution does not require any software to be distributed or maintained on end user machines.
The Webcast platform fully supports video optimization using any device capable of caching HTML5 (HLS) streams, such as Blue Coat ProxySG.
Benefits of stream caching:
- Significantly reduces the bandwidth utilized by webcast viewers.
- Stream caching with your webcast is seamless for viewers.
Video Bridge
Video Bridge Guide for Presenters and Guest Admins
A video bridge allows presenters to connect to an event and broadcast from different camera sources and locations. As a presenter, you will join the event from your computer and connect the video source that you'll use to speak to the audience. Often this is a webcam, but you can also broadcast and present from a video conferencing system, Skype for Business, or a telephone (where you're not on camera).
Use this guide to learn how to test your system and connect to the video bridge.
This guide contains the following topics:
System requirements
All presenters and venues must meet the following minimum system requirements:
- Operating system - Windows 10, Windows 8.1+ Pro, macOS 10.14+
- Processor - Intel Core i5 3.0GHz or equivalent
- RAM - 4GB
- Internet connection - A dedicated and hardwired high-speed connection of 1.5 Mbps+ (upload and download). We do not recommend using a Wi-Fi connection since it is prone to dips in bandwidth that can negatively impact your video connection.
- Internet Browser - Chrome (latest version), Firefox (latest version), Microsoft Edge (latest version)
Note: Firefox does not support screensharing for Video Bridge at 720p events.
- Webcam - High quality or HD webcast (for example, Logitech C920)
- Microphone - Headset microphone or webcam mic with built-in noise-cancelling
Note: If you are using a microphone, use headphones or earbuds to prevent feedback from your computer speakers.
Before the event, presenters and venues must also:
- Plug in their computers. Do not run an event on battery power.
- Disconnect from the VPN.
Test your system before the event starts
Don't want to read? Watch the video.
It's important that you make sure your system is compatible before the event begins to identify and resolve any issues. At least 48 hours before the event, join the Live Studio and run a diagnostic on your system with the network and equipment you plan to use on the day of the event. This checks the quality of your audio and video connections.
You should have received an email with login details and a link to the Guest Admin or Guest Presenter Access site. The Guest Admin site includes a button that lets you enter the Live Studio.
To test your webcam and microphone:
- Sign in to the Guest Admin site and click Live Presenter Studio.
- In the Live Studio, click Test your webcam.

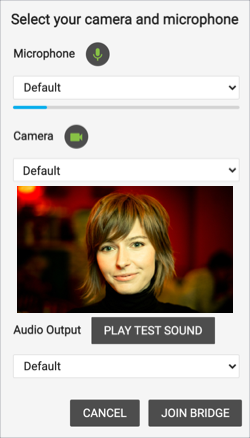
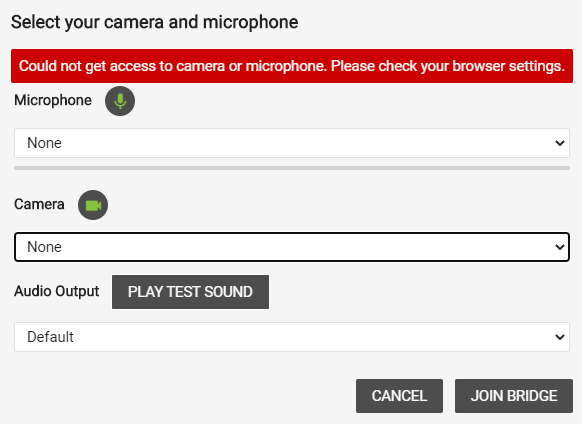
- Enter your name and click Next.
- Select the Microphone, Camera, and Audio Output sources you will use during the event. Confirm that the microphone volume level and webcam preview work properly and click Play Test Sound to make sure you can hear the event audio during the event.

- Click Join Bridge and follow the guided connection test instructions.
The test records a short clip of your audio and video and plays it back to you. Make sure the video plays clearly, without feedback or echo. If it does not record correctly, there could be a network connection issue. Check that you have a wired (LAN) connection to the internet and that it is active.
If you have any issues, run the test again. If you continue to have issues, contact support or your event host.

Connect to the video bridge
Don't want to read? Watch the video.
To join the video bridge:
- Sign in to the Guest Admin site and click Live Presenter Studio.
- Click Connect using my webcam.
- Enter your name and click Next.
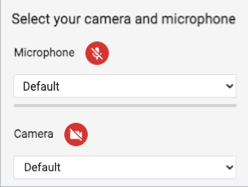
- Select the Microphone, Camera, and Audio Output sources you want to use for the broadcast. Confirm that the microphone volume level and webcam preview work properly.
If you are a technical assistant or moderator who will not speak or appear on camera, click the Mic button to mute your microphone and click the Camera button to turn off your webcam.

- Click Play Test Sound to make sure you can hear the event audio during the event.
- Click Join Bridge.
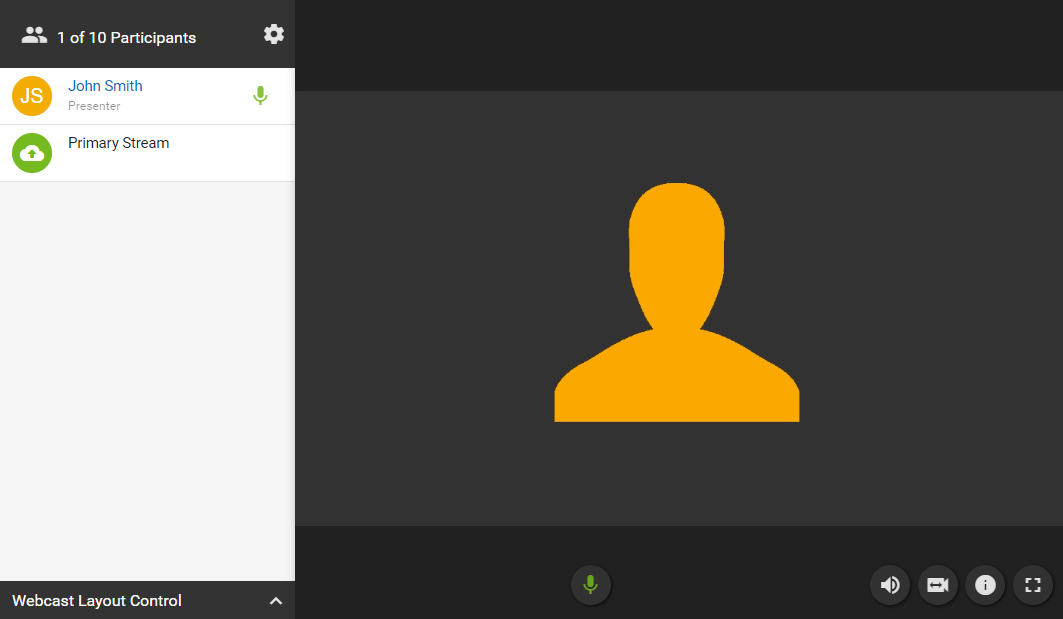
About the video bridge (moderators)
As a moderator, you have full control of presenters and video bridge functions. You can share your webcam, share your screen or an application window (720p events only), and manage your own event experience. Click on a presenter's name to hide their webcam, mute their audio, update their name, promote them to a moderator, and disconnect them from the video bridge.
If you're using an advanced video bridge, you can also lock the Live Studio to prevent other presenters from joining, dial out to a Microsoft Teams or Zoom room or Skype for Business using a SIP, H.323, or RTMP connection, and stream to an external platform like Youtube Live or Facebook Live.
The following example shows the moderator view of the video bridge with a 720p video player and advanced video bridge turned on.
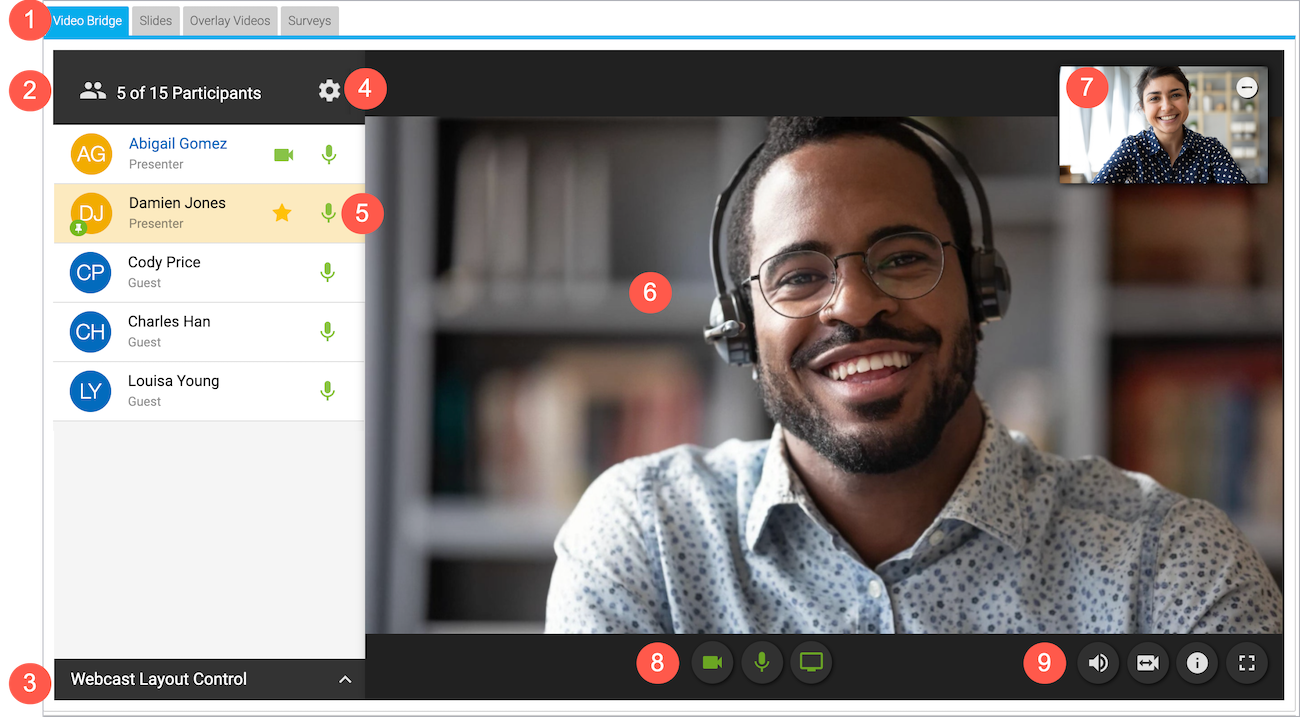
Use the following table to learn more about the video bridge controls and options.
| Number | Element | Description |
|---|---|---|
| 1 | Live Studio tabs | Controls for different aspects of the event are grouped into tabs. Click the Video Bridge tab to manage your own webcam and audio, select a webcam layout, and to manage presenter webcams and audio.
Controls for slides, surveys, overlay videos, and other content you uploaded to the event are displayed in their own tabs next to the Video Bridge tab. |
| 2 | Presenter list | The moderators and presenters who are connected to the video bridge, listed alphabetically. You and other moderators (with Presenter role) are listed first, followed by all other presenters (with Guest role). Use the buttons next to your name to mute yourself or turn off your webcam. Click a presenter’s row to mute their mic, promote them to moderator, change their display name, and disconnect them. |
| 3 | Webcast layout controls | Click Webcast Layout Control and choose whether to automatically switch between presenters' webcams as they speak (voice-activated switching), include their names on the screen, and how webcams are arranged on stage (one webcam or multiple in a grid view or filmstrip view). To learn more, see Change the presenter webcam layout on the video bridge. |
| 4 | Advanced video bridge settings | Additional options for advanced video bridge. Click the Settings (gear) button to lock the Live Studio and prevent other presenters from joining, dial out to an external meeting room, and livestream to an external platform. |
| 5 | Pinned presenters | A pin next to a presenter's name indicates their webcam is pinned on stage (voice-activated camera switching is off). If a presenter is pinned in the Single Speaker layout or pinned to a large frame in a Filmstrip layout, their row is highlighted yellow and a star is displayed next to their name. |
| 6 | Active talker | The webcam of the presenter who is speaking. By default, Voice Activated Camera Switching is turned on and highlights the webcam of the presenter who is speaking (and recent speakers when using a Grid or Filmstrip layout). There is also a speaker icon that is displayed in the presenter's row in the presenter list while they're talking.
To choose whose webcams are on stage, turn off voice-activated switching and Pin presenter webcams on the video bridge. |
| 7 | Your webcam view | A live view of your webcam. Click the Hide (-) button to hide your self-view. |
| 8 | Your video bridge controls | Turn your webcam on or off, mute or unmute your audio, and share your screen (720p only). |
| 9 | Additional video bridge controls | Change your audio output volume and device, change your webcam and microphone connection, check event streaming details, and expand the Video Bridge tab full screen. |
About presenter webcam layouts
On the video bridge, you can choose how you want to arrange presenter webcams and which presenters to display to the audience during the Live event. This article introduces presenter webcam layouts, explains how voice-activated camera switching works with them to manage who is on stage, and how you can manually "pin" presenters on stage.
Important: To see the video bridge and interact with other presenters, you must join with a webcam. Presenters who select I will not be appearing on camera won’t be able to see or hear presenters who have joined the video bridge.
Jump to: Presenter webcam layouts | How the video bridge fills the stage) | Voice-activated camera switching | Pin presenters on stage
Presenter webcam layouts
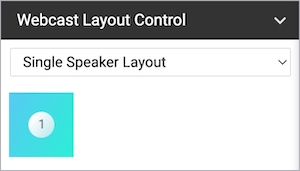
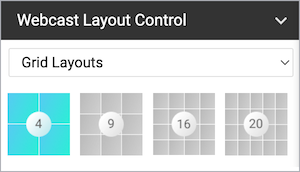
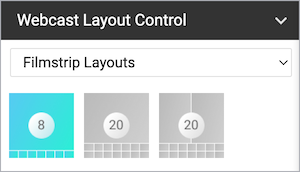
Presenter webcam layouts control the number of presenters on stage and how their webcams are arranged. By default, the event shows one presenter - Single Speaker layout. You can change this layout before the event begins and at any time during the Live event.
Layouts include:
- Single Speaker - displays one presenter at a time. This is the default layout.
- Grid – displays up to 4, 9, 16, or 20 presenters in equally-sized frames
- Filmstrip - displays up to 8 or 20 presenters, with one or two presenters highlighted in large frames above a filmstrip with the other presenters
How the video bridge fills the stage
The frames in the layout are initially filled in the order that presenters join with a webcam. The number of available spots on stage depends on your selected layout. The video bridge doesn't set aside empty frames; instead it adds frames as needed, for each presenter.
Note: If a presenter joins with a webcam and then turns off their webcam, their frame is still displayed on stage and is blacked out.
- By default, the Single Speaker webcam layout is selected and the first presenter who joined is displayed on stage.
- In Grid layouts, frames are filled from left to right, one row at a time. Once a row is filled, a new row starts below the previous one. The first presenter to join with a webcam is in the top left frame.
- In Filmstrip layouts, the first one (or two) presenters who joined are displayed in the large frames, and remaining presenters fill the filmstrip from left to right, in the order they joined. Like grids, a new row starts once the first row is filled. The filmstrip has seven frames per row. The 20-presenter filmstrip has three available rows.
That's the initial order. Now let's look at voice-activated camera switching.
Voice-activated camera switching
Voice-activated camera switching tracks when presenters speak and keeps a history of most- to least-recent speakers. It uses this information to adjust who is on stage and makes sure the active talker is visible. This varies depending on the webcam layout you select. When you join the video bridge, voice-activated camera switching is on by default.
When there are more presenters than spots available, other presenters remain off-stage until they speak. Then, voice-activated camera switching moves them to the stage, bumping another presenter off.
- In the Single Speaker layout, the active talker replaces the presenter that spoke previously.
- In Grid layouts, presenters remain in their own frames while speaking. If an off-stage presenter speaks, that presenter moves to the grid, replacing the presenter who spoke least recently, no matter where they are in the grid.
- In Filmstrip layouts, the active talker is displayed in a large frame above the filmstrip. In the two-frame layout, the large frames show the active talker and the presenter who spoke immediately before. The filmstrip shows a history of presenters who have spoken, left to right from most to least recently.
When a person in the filmstrip speaks, they move to a large frame and the person previously in that frame moves to the first spot in the filmstrip, shifting other presenters to the right. In the two-frame layout, the presenter in the large frame who spoke less recently is replaced.
Pin presenters on stage
To choose who is on stage, turn off voice-activated camera switching and pin presenters. Pinned presenters remain on stage whether they are speaking or not.
The number of presenters you can pin is limited by the number of frames included in the layout. When there are more presenters than spots available, other speakers remain off-stage, but can still be heard when they speak. To remove presenters from the stage, unpin them.
- In the Single Speaker layout, pin the presenter you want to keep on stage. In the presenter list, a yellow star indicates which presenter is highlighted (that is, pinned on stage).
- In Grid layouts, pin the presenters you want to keep on stage, up to the number of spots in the grid. If they were already on stage, presenters remain in their places when you pin them.
- In Filmstrip layouts, presenters are displayed in the order that you pin them, starting with the large frames and then filling the filmstrip from left to right. The first one (or two) presenters you pin are highlighted in the large frames above the filmstrip as lead presenters.
Set the lead presenters (filmstrip only)
In the presenter list, pins are numbered to let you know the order the presenter webcams are displayed. The yellow star next to pin 1 (and pin 2) indicates those presenters are highlighted in the large frames above the filmstrip.
To move a presenter to a large frame above the filmstrip, click their Up arrow button. The person previously in that frame moves to the first spot in the filmstrip, shifting other presenters to the right. In the two-frame layout, the presenter with pin 2 is bumped to the filmstrip.
Change the presenter webcam layout on the video bridge
Change the webcam layout to display more presenters during the Live event. By default, the Single Speaker layout is selected and displays the active talker to the audience. You can change this layout before the event begins and switch layouts any time during the Live event. To learn more about presenter webcam layouts, see About presenter webcam layouts.
By default, Voice Activated Camera Switching is turned on and displays the active speaker (and recent speakers when using the Grid or Filmstrip layout). To display specific presenter webcams to the audience, see Pin presenter webcams on the video bridge.
Note: Only moderators can change the presenter webcam layout. To allow a presenter to change the webcam layout, promote them to a moderator.
To change the presenter webcam layout:
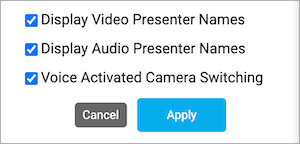
- In the Live Studio, under the presenter list, click Webcast Layout Control.
- Select the number of presenter webcams you want to display. For:
- Single Speaker layout, one presenter is already selected.

- Grid layouts, you can select a 2x2, 3x3, 4x4, or 5x4 grid.

- Filmstrip layouts, you can show up to 8 presenters with one presenter highlighted in a large frame or 20 presenters with one or two presenters highlighted.

- Single Speaker layout, one presenter is already selected.
- Optional. Select Display Video Presenter Names to show the names of presenters at the bottom of their webcams. Display Audio Presenters Names and Voice Activated Camera Switching are turned on by default.

- Click Apply.
Pin presenter webcams on the video bridge
By default, voice-activated camera switching is turned on and controls who is on stage.
If you'd like to choose which presenter webcams are on stage, turn off voice-activated camera switching and pin presenters to the video bridge. In Filmstrip layouts, you can also select the presenters to highlight above the filmstrip. To learn more, see About presenter webcam layouts.
Note: Only moderators can pin presenter webcams. To allow a presenter to pin webcams, promote them to the Presenter role.
Jump to: Pin presenters (single speaker and grid) | Pin presenters and set the order (filmstrip)
To pin a presenter's webcam (single speaker and grid layouts):
- In the Live Studio, under the presenter list, click Webcast Layout Control.
- Clear the check box next to Voice Activated Camera Switching.

- In the presenter list, click the Pin button next to each presenter you want to display on stage. You can pin up to the total number of spots in the selected layout.

In the Single Speaker layout, a star next to a pinned presenter's name indicates they are highlighted on stage.
- When finished, click Apply.
The video bridge updates and shows the presenters you pinned.
To pin presenters and set the order (filmstrip):
- In the Live Studio, under the presenter list, click Webcast Layout Control.
- Clear the check box next to Voice Activated Camera Switching.

- In the presenter list, click the Pin button next to each presenter in the order you want to display them on stage. You can pin up to the total number of spots in the selected layout.
In the presenter list, pins are numbered to let you know the order the presenter webcams will be displayed. The yellow star next to pin 1 (and pin 2) indicates those presenters are highlighted in the large frames.

- To highlight a presenter in a large frame above the filmstrip, click the Up arrow button next to their name.
- When finished, click Apply.
Video Bridge Events - Speaker Can't Connect
Connecting Using a Webcam
- If a presenter can connect to the Video Bridge but cannot be seen/heard (and appears as an orange silhouette), this indicates their network is blocking access to their camera and/or microphone.
- If you are connected to a VPN, please disconnect and try to join the Video Bridge again. Avoid using a VPN connection when presenting.
- If you are joining from a Corporate network, your network's security may be blocking access to your camera and microphone. Please test using another network, like a public or home network, to confirm if the issue continues. Your IT department would need to allow access to your device using the requirements outlined here: https://www.webcasts.com/networkresources/

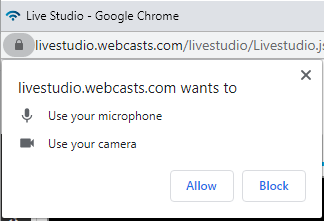
- You should see a prompt in the browser asking if you would like to use your webcam/microphone. Click Yes when prompted.
- Close any programs and other browsers that could be using your webcam and make sure none of these programs are running in the background (ex. Zoom, Microsoft Teams, etc.).

- Check your browser’s settings to make sure the browser can connect to webcam and microphone.
- For Chrome:
- At the top right, click Settings (three vertical dots).
- In the "Privacy and Security" section, click "Site settings".
- Under the "Camera" or "Microphone" options, select "Ask before accessing".
- To remove permissions you already granted/blocked to sites, click on the Camera or Microphone option. Make sure there are no “.webcasts.com” URLs listed as “Blocked”.
- For Firefox:
- Click on the Show Site Information button (top left of the browser next to the URL).
- Click on the arrow button next to the “livestudio.webcasts.com” name.
- Click More Information.
- On the Permissions tab, make sure the Use the Camera and Use the Microphone options are set to Use Default or Allow.
- For Microsoft Edge:
- At the top right, click Settings (three horizontal dots).
- Click on the Menu button in the top left (three horizontal lines).
- Select Site Permissions in the list.
- Under "Camera" or "Microphone," make sure they are set to Ask First.
- To remove permissions you already granted/blocked to sites, click the Camera" or "Microphone" option. Make sure there are no “.webcasts.com” URLs listed as “Blocked” in the Managed exceptions section.
- Internet Explorer is not supported for use with the Video Bridge as the Video Bridge requires your browser to support HTML5.
- For Chrome:
- Ensure your Operating System is not blocking access to your Camera or Microphone.
- For the Windows 10 Operating System, follow these instructions: https://support.microsoft.com/en-us/help/4468232/windows-10-camera-microphone-and-privacy
- For the Mac OS, follow these instructions:
Connecting Using a VCU
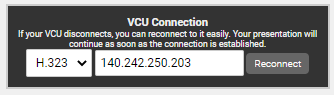
- To connect your VCU to the presentation, the platform will dial out and connect to the address listed in the Live Studio. Click Establish Connection to connect your VCU to the event. If the VCU connection fails initially, you will be able to re-establish the connection.

- Please ensure the VCU is on and streaming an audio/video feed. Your VCU needs to accept an inbound connection in order to connect to the event. Contact your IT department to confirm if your network will allow an inbound connection.
- Make sure you have selected the correct protocol for your call. Select the H.323 or SIP protocol depending on what protocol your video conferencing device supports. If the device supports URI and/or IP calling, please try both options. Contact your VCU provider to confirm which protocol(s) are supported.
- Double check that you are using the correct address for your VCU, confirming the alias (for a SIP call) or IP (for a H.323 call). Make sure your VCU doesn’t require a PIN to be included in the address. This information can be accessed in your VCU setup.
- Make sure the VCU isn’t connected to another call and disconnect if needed.
- If the VCU disconnects, you can quickly reconnect using the controls in the Live Studio.
Connecting Using Skype
- Close any programs and other browsers that could be using your webcam and make sure none of these programs are running in the background.
- For Lync/Skype for Business users: Your company may block access to external locations, which would prevent you from connecting to the Video Bridge. Below is a link to update your Lync/Skype for Business settings to allow external access. Depending on your setup, this may require your IT department to allow access (Lync/Skype for Business). Help Information: https://support.office.com/en-us/article/Allow-users-to-contact-external-Skype-for-Business-users-b414873a-0059-4cd5-aea1-e5d0857dbc94
- For regular Skype users: You need to provide an email address for your Skype account to connect. Make sure your Skype account is associated with a Microsoft email address to utilize Skype on the Video Bridge (Skype Acquisition).
If you continue to have issues, make sure you meet the network requirements for the Video Bridge listed here: https://www.webcasts.com/networkresources/